
Play with Flow
Drive Cubase live from the web app — track selection, articulation switching, solo, show, hide — all in real time.
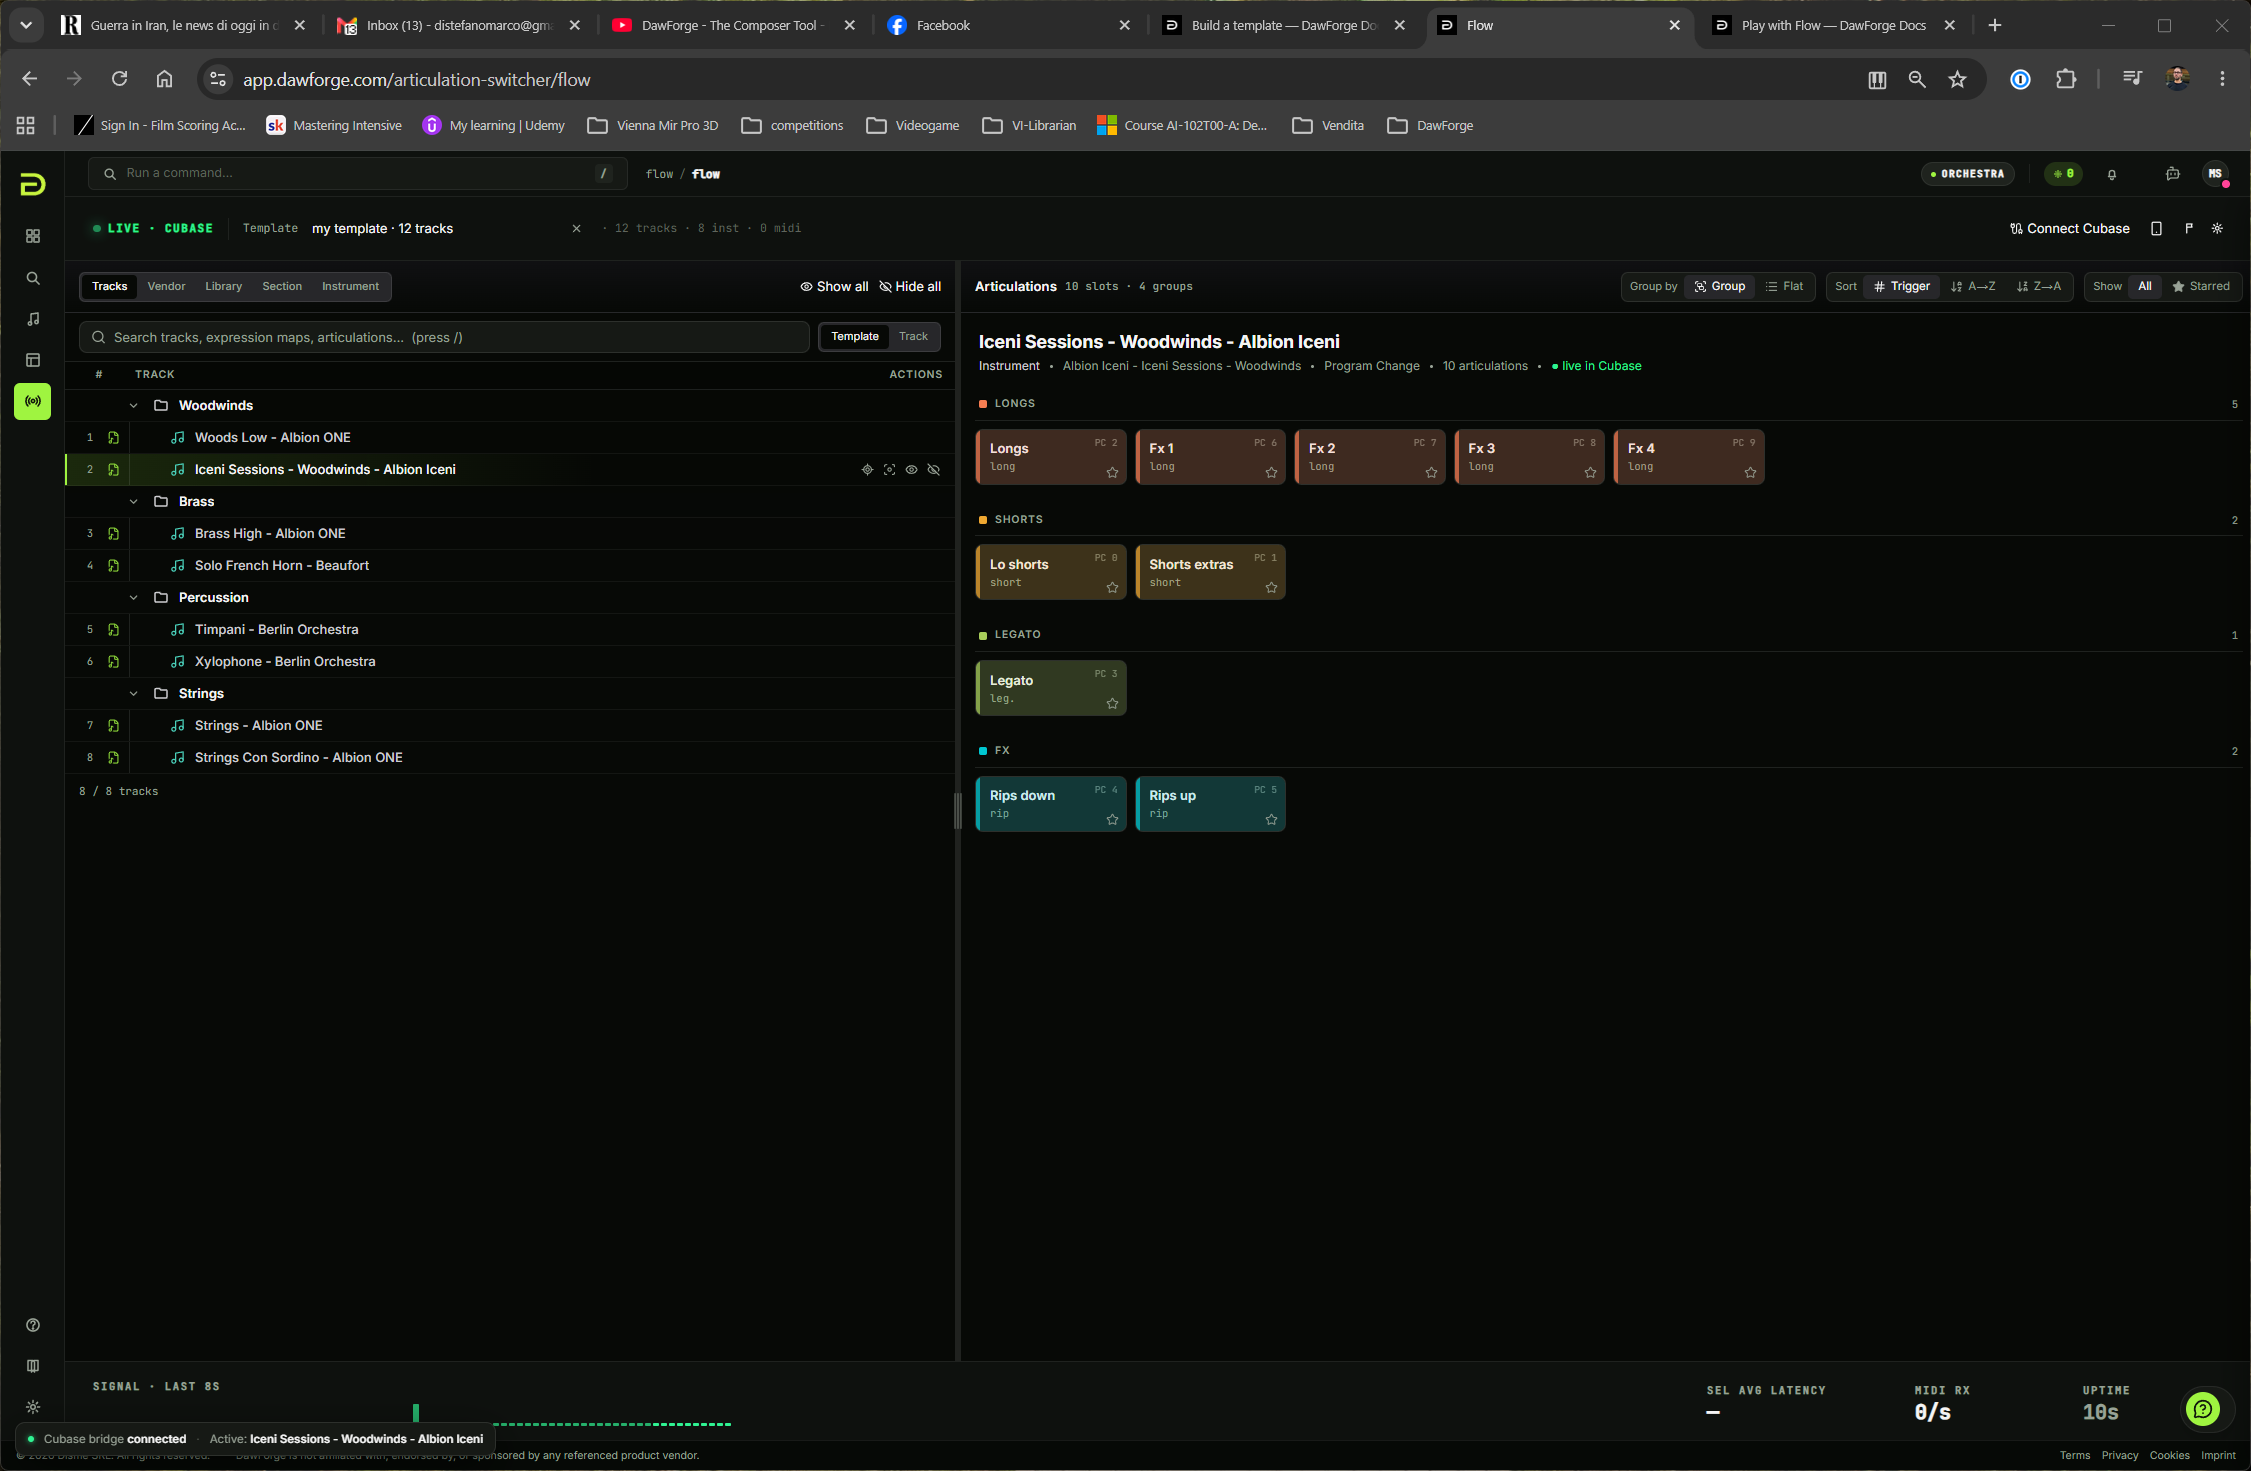
Flow is DawForge's real-time link to Cubase. The page works like a DAW: your template's track list on the left, the selected track's articulation grid on the right, and a status bar at the top. Select a track in Cubase and its row lights up here; click a row here and Cubase selects the track. Click an articulation and the switch fires straight into your library.
This video is hosted on YouTube
Loading it lets YouTube set cookies and receive your IP address. Accept external media to watch it here — see our Cookie Policy.
What you need first
-
Cubase connected to DawForge and showing Connected (Install and connect Cubase).
-
A template to play. Either works:
- one you imported from Cubase (Import a Cubase template), or
- one you built yourself from libraries you own (Build a template).
Flow lists both kinds in the same picker — there's no difference once you're playing.
Linking each track to a library patch is optional — Flow works without it. Linking just unlocks more: see Linking is optional below.
Steps
Open the Flow page and pick your template
Go to /flow and choose a template from the picker at the top. You'll see:
- Left rail — the template's track list, mirroring your Cubase folder structure.
- Right pane — the articulation grid for whichever track is currently selected.
- Top status bar —
Connected(green) and the name of the currently selected Cubase track.
Install the template's Cubase presets
Flow's select / solo / show / hide actions are powered by small Cubase presets — one per track. You install them once per template, straight from the Flow page.
- With your template selected, click Connect Cubase in the top bar and go to Step 2 — Logical Editor presets, then click Install presets.
- The first time, your browser asks for permission to a folder. Choose Cubase's preset folder:
C:\Users\<You>\Documents\Steinberg\Cubase\User Presets\Project Logical Editor\/Users/<You>/Documents/Steinberg/Cubase/User Presets/Project Logical Editor/- DawForge writes the presets into a
DawForgefolder there for you, and remembers the folder. Next time — for this template or any other — it installs silently, no folder prompt.
Cubase 15 picks the presets up live — no restart needed. (Older Cubase versions may need a restart.)
On Safari or Firefox, the button downloads a zip instead (those browsers can't write to a folder for you). Just unzip it so the DawForge folder lands inside the Project Logical Editor folder shown above. The end result is identical.
Re-install whenever you change or re-import the template — the presets are tied to the track names as they were when you installed.
Open the matching Cubase project
In Cubase, open the actual project that goes with this template — the one you exported from, or one built from it. Flow finds tracks by name, so the names in Cubase must match the names in the DawForge template.
Drive selection both ways
- From Cubase → Flow: click any track in Cubase. The matching row in the Flow rail lights up and its articulations fill the grid.
- From Flow → Cubase: click a row in the Flow rail. Cubase jumps to and selects that track — at any distance, in any folder, even if it's hidden.
Fire articulations
With a track selected, click a cell in the articulation grid. DawForge sends the right switch (keyswitch, CC, or program change) to Cubase, and your library responds.
The cells come from that track's linked library patch. If a track isn't linked yet, its grid is empty — link a patch from the template page (see Annotating tracks).
Try solo, show, and hide
Above the rail are three buttons:
- Solo — leaves only the current track playing and mutes the rest. Similar names are handled automatically (soloing "Violins I" won't drag in "Violins II").
- Show — un-hides matching tracks.
- Hide — hides everything except matching tracks.
These work even on hidden tracks deep inside folders.
Linking is optional, but it unlocks more
You can play a template in Flow whether or not its tracks are linked to library patches. Here's the difference:
| Without a link | With a link |
|---|---|
| The track still appears in the rail. You can select, solo, show, and hide it. | Everything on the left, plus… |
| In the grouped views (by Vendor, Library, Section, Instrument), the track collects in an "Unlinked" row at the bottom — you can still act on it from there. | …the track joins its proper Vendor / Library / Section / Instrument group, so you can solo or show a whole section at once. |
| The articulation grid is empty for that track. | The grid fills with the patch's articulations, so you can switch techniques live. |
In short: linking lets you work in groups (a whole section, a whole library) and switch articulations. If you only need to jump between tracks and solo/show/hide them, you don't have to link anything. Linking is covered in Annotating tracks.
Verify it worked
Click a row in the Flow rail and watch Cubase scroll to and select that track — at any distance, in any folder, hidden or visible. For a linked track, the grid fills and clicking a cell changes the active articulation on the playing track.
If something went wrong
- Selection fires but nothing happens → the Cubase presets aren't installed (or are stale from a previous template). Open Connect Cubase → Install presets again.
- "Preset not found" message → a track name doesn't match between Cubase and the template. Names are case-sensitive and must match exactly.
- Status bar says
Disconnected→ Cubase isn't linked. See Install and connect Cubase and Flow troubleshooting. - Articulation grid is empty for a track → that track isn't linked to a patch yet. Open the template page and link one.
Next
- Mobile companion — drive Flow from your phone.
- Flow troubleshooting.