
Install and connect Cubase
Install the DawForge MIDI Remote bridge in Cubase Pro, create the virtual port, and verify the connection from the app.
By the end of this page, Cubase will see DawForge as a MIDI Remote device and the web app will be able to drive track selection, articulation switching, and show/hide actions in real time.
This video is hosted on YouTube
Loading it lets YouTube set cookies and receive your IP address. Accept external media to watch it here — see our Cookie Policy.
Before you start
If you haven't already, run through Tools you need first. Specifically you need:
- Cubase Pro (the Pro edition is required — Artist and Elements don't expose the Project Logical Editor or Track Archive export). For the exact minimum version, see Tools you need.
- A virtual MIDI port utility:
- Windows: loopMIDI (free).
- macOS: the built-in IAC Driver in Audio MIDI Setup (Applications → Utilities).
- A signed-in DawForge account.
Steps
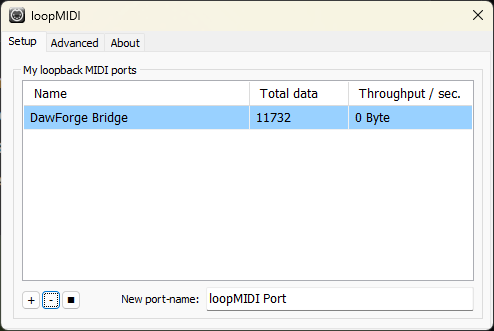
Create a virtual MIDI port named DawForge Bridge
DawForge talks to Cubase over a virtual MIDI port. The port must be named exactly DawForge Bridge (case-sensitive, single space) — the script binds to it by name.
- Install and open loopMIDI.
- Type
DawForge Bridgeinto the New port-name field at the bottom-left. - Click the + button. The port appears in the list above.
- Leave loopMIDI running. It auto-launches with Windows by default.
- Open Audio MIDI Setup → Window → Show MIDI Studio.
- Double-click the IAC Driver icon.
- Tick Device is online if it isn't already.
- Under Ports, click the + button. Rename the new port
DawForge Bridge. - Click Apply and close the window.
Install the DawForge bridge and presets
The bridge is generated per template — sized to that template's tracks and the actions you pick — and installed together with that template's Project Logical Editor presets, all from the Connect Cubase wizard in Flow:
- Open Flow (
/flow) and pick a template. (No template yet? Import a Track Archive first.) - Click Connect Cubase in the top bar — it opens on Step 1 — Bridge & presets.
- Choose which per-track actions you want. Each one costs Cubase a little selection latency (it walks every binding on each track change), so DawForge shows a live estimate and picks a sensible default:
- Show / Hide and Show-only (solo) — the visibility actions, on by default.
- Select (go-to) — jump Cubase's selection to a track. The expensive one (a whole extra binding pool), off by default; it also needs Show, since Cubase can't select a hidden track.
- Click Install. In Chrome or Edge, pick one folder once when prompted — your
Steinberg/Cubasesettings folder. DawForge findsMIDI RemoteandUser Presetsinside it automatically, writes the bridge and the presets into the right sub-paths, and remembers the location:
C:\Users\<You>\Documents\Steinberg\Cubase\MIDI Remote\Driver Scripts\Local\ArtificialHarmonics\DawForgeBridge\
C:\Users\<You>\Documents\Steinberg\Cubase\User Presets\Project Logical Editor\DawForge\
/Users/<You>/Documents/Steinberg/Cubase/MIDI Remote/Driver Scripts/Local/ArtificialHarmonics/DawForgeBridge/
/Users/<You>/Documents/Steinberg/Cubase/User Presets/Project Logical Editor/DawForge/Per template. The bridge is specific to the template (and action set) it was generated for. When you switch templates or edit one, re-run Connect Cubase to regenerate it — Flow warns you in the toolbar when the installed bridge doesn't match the open template. Reinstalling rewrites only DawForge's own DawForge preset subfolder; your other PLE presets are untouched.
Safari or Firefox? They don't support direct folder writes yet. Click Download zip instead in the wizard to get a single dawforge-cubase-bundle.zip containing both trees, and extract them into the two folders above yourself. Same result, one extra step.
Pair the script in MIDI Remote Manager
Cubase scans for MIDI Remote scripts at startup, so after a fresh install — and after each reinstall when you switch or edit templates — restart Cubase or re-add the surface, otherwise it keeps running the old bridge. In Cubase:
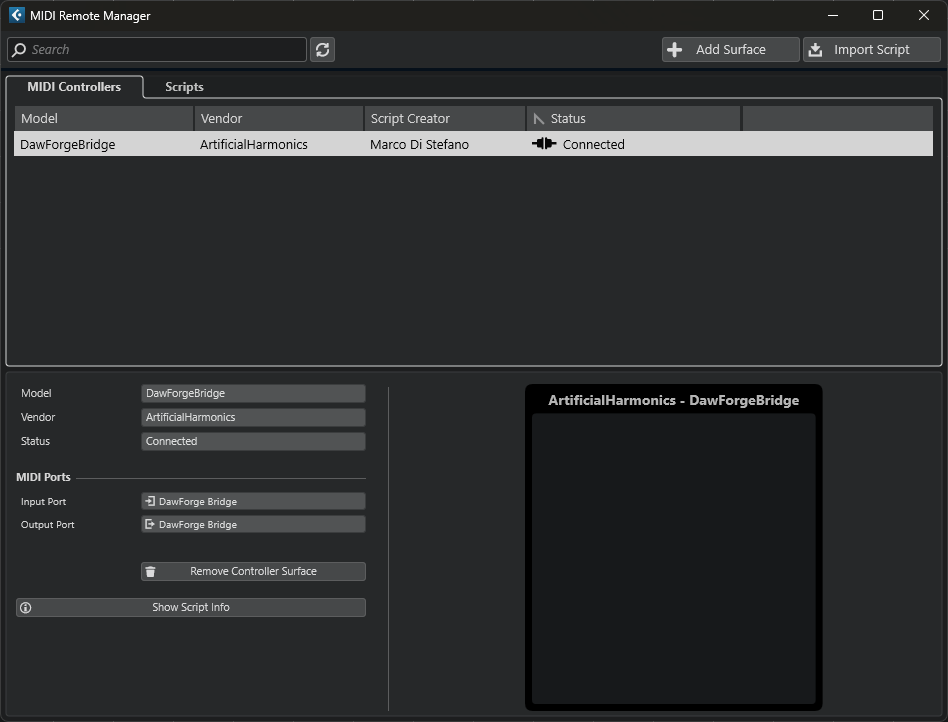
- Open Studio → Studio Setup → MIDI Remote → MIDI Remote Manager.
- Find DawForge Bridge in the Scripts list.
- If the MIDI Input / MIDI Output columns show
Unassigned, click each cell and pickDawForge Bridge(the virtual port you created). - A green badge means the script loaded cleanly. A red badge means a syntax error — re-run Connect Cubase in Flow to regenerate and reinstall the bridge.
Verify the connection from the web app
Open any Flow-aware page in the DawForge app (for example Flow under any template). The status indicator at the top of the page should show Connected. Press a key on your MIDI controller, then click an articulation in the grid — Cubase should switch.
If the status stays red, jump to Flow troubleshooting.
Verify it worked
A successful install means three things are true at once: loopMIDI / IAC shows the DawForge Bridge port; the MIDI Remote Manager shows the bridge with green status and both ports bound; and the DawForge app's Flow page shows Connected. If any one of those is missing, fix it before moving on — every later workflow assumes this pairing is in place.
If something went wrong
- Script shows as
Unassignedand won't bind → the port name doesn't match. Recreate the virtual port exactly asDawForge Bridge(no trailing space, single space between words). - Red badge in MIDI Remote Manager → the script file is corrupted or wrong-version. Re-download from the app and replace it.
- Connected in Cubase, "Disconnected" in the web app → the browser tab doesn't have Web MIDI permission. Click the address-bar permission icon and allow MIDI access; refresh the tab.
- Connection drops after a few minutes → known with some Bluetooth audio + MIDI stacks on macOS. Use a wired audio output during sessions.